There are 6 basic installation types. Please choose your installation type below and follow the instructions. Please keep in mind that there are many different seat and vehicle combinations and each can pose it's own nuances. Every seat install is different so please use these installation instructions as a guideline.
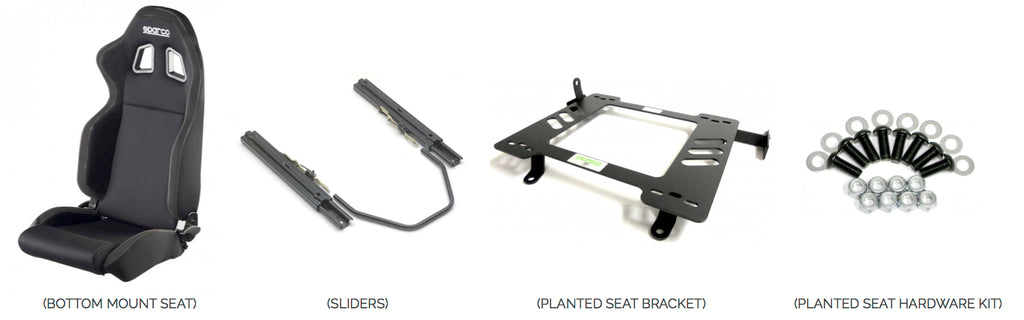
- Bottom Mount Seat With Sliders
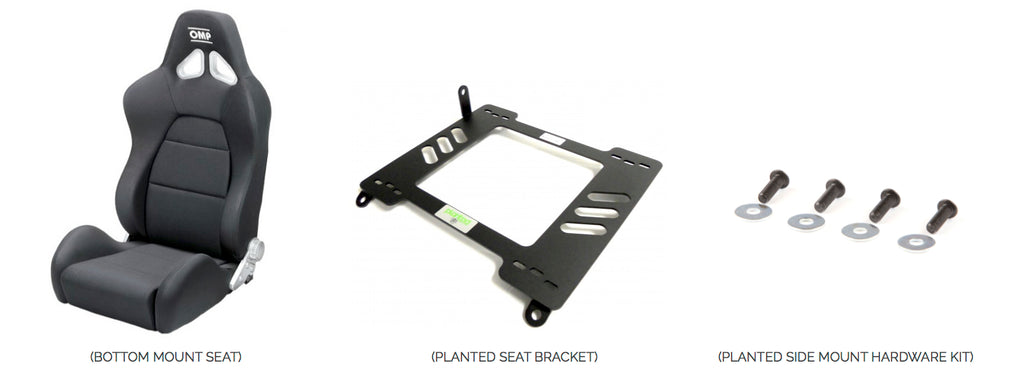
- Bottom Mount Seat Fix Mounted Without Sliders
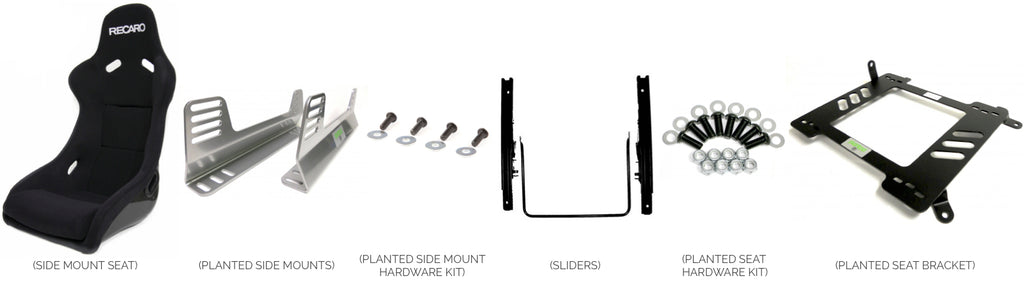
- Side Mount Seat With Sliders
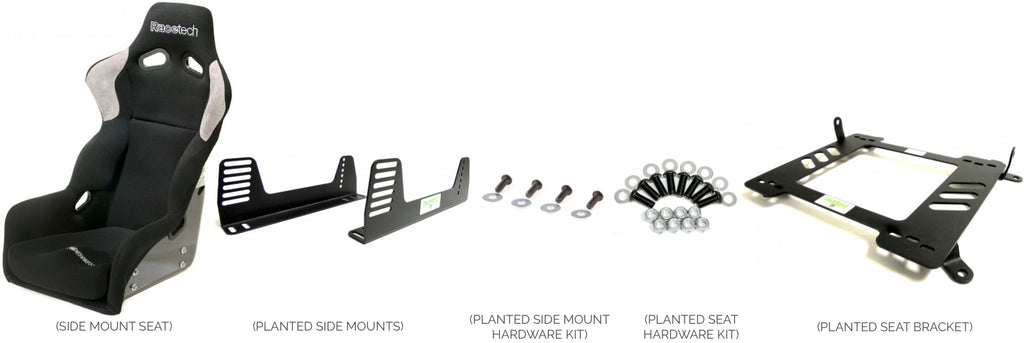
- Side Mount Seat Fix Mounted Without Sliders
- Side Mount Seat With Sliders Onto 240SX Or 300ZX LOW Style Seat Brackets
- Side Mount Seat Fix Mounted Without Sliders Onto 240SX Or 300ZX LOW Style Seat Brackets
Bottom Mount Seat With Sliders
- Inspect the parts - Make sure that you have the correct items for your installation. The number one reason for fitment issues is having the wrong components.
- Disconnect the battery - You'll want to disconnect the battery for several reasons. First, you'll have the doors open for an extended period of time which can drain the battery with door open indicator lights on. Second, disconnecting the seat belt, weight & airbag sensors can cause warning lights to come on if the battery is still connected. Lastly, it's always a good idea to disconnect the battery when working on anything associated with the airbag. *Before you disconnect the battery do yourself a favor and roll down all power windows and adjust any power seats to a centered, low postision. This will make the removal much easier. If you have a power only trunk it's not a bad idea to open it in case you need access for any reason.
- Remove the factory seat(s) - Before removing the driver seat be sure to note the seating position. The steering wheel in most vehicles is off-center from the seat. This can be accentuated with an aftermarket seat which is a different size then the factory seat. Using a wrench, socket or similar tool remove the bolts that hold the factory seat(s) to the floor of the vehicle. Disconnect any wires under the seat(s). Carefully remove the seat(s) being sure to keep the factory floor bolts as you will re-use them to bolt in your Planted Seat Bracket.
- Test fit the Planted Seat Bracket - Now that you have the factory seat(s) out of the way, set your Planted Seat Bracket(s) in the vehicle and make sure you can thread in all of the floor mounting bolts (in some cases the factory floor bolts may be too long to be re-used so you may need to source some new hardware). If you have any fitment issues please double check that you have the correct seat bracket(s) for your vehicle then contact us so we can help. Please note that the seat bracket may not fit properly if the floor of the vehicle has been modified for any reason. For example, an accident repair or roll bar / roll cage installation. Assuming the bracket(s) fit properly, take a few pictures so you can submit your installation for our website, then remove the bracket(s) from the vehicle as you'll assemble the components outside of the vehicle.
- Assemble all components - Using 4 bolts from the Planted Seat Hardware Kit attach the sliders to the bottom of the seat. Make sure the sliders are in the correct orientation. The handle should be forward and to release the sliders you'd pull up on the handle (while sitting in the seat). Now, with the seat bottom side up and the sliders in a parallel even position, set the Planted Seat Bracket bottom side up on the sliders to align one of the hole patterns on the Planted Seat Bracket with the hole pattern on the sliders (Make sure you've got the driver seat matched with the driver bracket and the passenger seat matched with the passenger bracket). Once you've found the matching pattern use 4 bolts, washers and nuts from the Planted Seat Hardware Kit to finger tighten the Planted Seat Bracket to the sliders. The washers and nuts go on the bottom of the Planted Seat bracket with the bolt head inside of the sliders (you'll have 4 unused washers and 4 unused nuts). If there is not a hole pattern on the seat bracket that matches your sliders, you can drill holes in the Planted Seat Bracket to create your own hole pattern. Be sure to use a metal drill bit! *Once you have drilled into the Planted Seat Bracket it is not returnable or exchangeable for any reason.
- Attach your seat belt receptacle (Optional) - If you are planning to retain the use of your factory seat belt, now is the time to attach your factory seat belt receptacle to the universal seat belt tab on the Planted Seat Bracket. Older vehciles have the seat belt receptacle attached to the chassis of the car and newer vehicles have it attached to the seat itself. This step is only necessary for vehicles with the seat belt receptacle attached to the seat. Remove the seat belt receptacle from the inboard side of the factory seat with the seat belt indicator wire attached. You'll want to retain this wire so you can plug it back into the car when complete. If you don't you'll have the fasten seatbelt indicator light eluminated as well as any beeping sound your vehciles makes. You may also need to remove the seat belt from the outboard side of the seat as some vehicles have the entire seat belt attached to the seat. The Planted Seat Bracket will include a seat belt tab on the outboard side as well as inboard side for vehicles that require it. Attach your seat belt and or receptacle to the universal tab(s) on the Planted Seat Bracket with a nut, bolt, washers or similar hardware (Grade 8 or better hardware is recommended). The seat belt tabs on the Planted Seat Bracket are universal so you will need to source your own hardware and in some cases may need to replace the seat belt receptacle itself due to fitment. The seat belt tab(s) can also be used to attach a harness lap belt.
- Test fit the assembly - Now that all of your components are attached in one assembly (or two if installing both driver and passenger seats), carefully place the assembly(s) in the vehicle. Finger tighten the seat bracket(s) to the floor of the vehicle. Because in the steps above you only finger tightened the sliders to the Planted Seat Bracket, you should have some adjustment from side to side in the slots on the Planted Seat Bracket. Sit in the seat and find your desired seating position. Ensure that the door closes and that the sliders are parallel and slide easily. If the seat hits the door preventing it from closing, the seat may be too large for the vehicle or you may need to drill new holes in the Planted Seat Bracket to position the seat closer to the transmission tunnel, away from the door. Similarly you may find that there is very little room for the seat belt receptacle and wish to move the seat closer to the door. The Planted Seat Bracket is universal and designed to work with many different sized seats so to acheive your specific desired position may require drilling your own hole pattern into the Planted Seat Bracket. You may also find it necessary to bend the seat belt tab(s). It is common to remove the inboard adjustment knob on wide seats to create more space for the seat and receptacle.
- Final assembly - Now that you have found your desired seating postion it's time to permanently tighten all hardware. You should attempt to get everything tight with the assembly still in the car to ensure the seating position doesn't change. You may want to enlist some help for this final step so one person can sit in the seat and hold the postion, while the other person tightens all of the hardware. If necessary, you can remove the assembly to tighten the sliders and seat belt receptacle(s) hardware but be careful to maintain the desired seat postion. Be sure to reconnect the seat belt indicator wire if retaining the stock belt so you don't get the fasten seat belt light and beeping noise.
- Reconnect Battery - Once everything is tight and the seat is sliding smoothly, reconnect the battery. *Please note, if you have an airbaig sensor or weight sensor in the factory seat you will likley have warning lights eluminated unless you install an electronic resistor(s). Every vehicle is different and may require a different ohm resistor so do some research online or consult an electrician to eliminate these warning indicators.
- Take pictures and submit your installation - Now that your installation is complete take some pictures and submit your installation to us along with the picture you already took so we can post them on our website as a reference for other customers, and feel free to share them on social media as well!
- Review your products - Now that you're all done be sure to review the products on our website. Other customers use these reviews to make buying decisions and we use them to make product improvements. Just locate the item(s) on our website and click the link at the bottom of the product listing below the description, then follow the instructions to submit your review.
Bottom Mount Seat Fix Mounted Without Sliders
- Inspect the parts - Make sure that you have the correct items for your installation. The number one reason for fitment issues is having the wrong components.
- Disconnect the battery - You'll want to disconnect the battery for several reasons. First, you'll have the doors open for an extended period of time which can drain the battery with door open indicator lights on. Second, disconnecting the seat belt, weight & airbag sensors can cause warning lights to come on if the battery is still connected. Lastly, it's always a good idea to disconnect the battery when working on anything associated with the airbag. *Before you disconnect the battery do yourself a favor and roll down all power windows and adjust any power seats to a centered, low postision. This will make the removal much easier. If you have a power only trunk it's not a bad idea to open it in case you need access for any reason.
- Remove the factory seat(s) - Before removing the driver seat be sure to note the seating position. The steering wheel in most vehicles is off-center from the seat. This can be accentuated with an aftermarket seat which is a different size then the factory seat. Using a wrench, socket or similar tool remove the bolts that hold the factory seat(s) to the floor of the vehicle. Disconnect any wires under the seat(s). Carefully remove the seat(s) being sure to keep the factory floor bolts as you will re-use them to bolt in your Planted Seat Bracket.
- Test fit the Planted Seat Bracket - Now that you have the factory seat(s) out of the way, set your Planted Seat Bracket(s) in the vehicle and make sure you can thread in all of the floor mounting bolts (in some cases the factory floor bolts may be too long to be re-used so you may need to source some new hardware). If you have any fitment issues please double check that you have the correct seat bracket(s) for your vehicle then contact us so we can help. Please note that the seat bracket may not fit properly if the floor of the vehicle has been modified for any reason. For example, an accident repair or roll bar / roll cage installation. Assuming the bracket(s) fit properly, take a few pictures so you can submit your installation for our website.
- Drill your seat's hole pattern onto the Planted Seat Bracket - Because you are not using sliders and are instead fix mounting your seat to the Planted Seat Bracket you will need to drill your seat's hole pattern onto the bracket. Set your seat on the Planted Seat Bracket inside the vehicle. Sit in the seat and move it around to find your desired seating position making sure the door still closes and the seat does not interfere with any other necessary functions of the vehicle. Once you have found your desired seating position have a friend trace the outside of the seat onto the seat bracket with a pencil or similar tool. Now romove the seat and Planted Seat Bracket from the vehicle. With the seat bottom side up place a large peice of transfer paper on the bottom and trace the seat's hole pattern and shape/outline onto the paper. Next, place the paper onto the Planted Seat Bracket aligning the outer shape on the paper with the shape your friend traced onto the Planted Seat Bracket. Tape the paper to the bracket so that it doesn't move. You are almost ready to drill your holes. Before you do, double check the location of the holes with a measuring tape, comparing the location on the bracket to the location of the holes on the seat. Once you are satisfied that you have the correct hole position, use a drill and metal drill bit to drill the hole pattern into the Planted Seat Bracket. The size of drill bit will vary depending on the hardware your're using. *Once you have drilled into the Planted Seat Bracket it is not returnable or exchangeable for any reason.
- Assemble all components - With the seat bottom side up place the Planted Seat Bracket bottom side up onto the bottom of the seat. Align the hole pattern you drilled into the Planted Seat Bracket with the hole pattern on the seat. Using the hradware that came with the seat or the Planted Side Mount Hardware Kit attach the Planted Seat Bracket to the seat. The washers go on the bottom side of the Planted Seat Bracket. Tighten the four bolts.
- Attach your seat belt receptacle (Optional) - If you are planning to retain the use of your factory seat belt, now is the time to attach your factory seat belt receptacle to the universal seat belt tab on the Planted Seat Bracket. Older vehciles have the seat belt receptacle attached to the chassis of the car and newer vehicles have it attached to the seat itself. This step is only necessary for vehicles with the seat belt receptacle attached to the seat. Remove the seat belt receptacle from the inboard side of the factory seat with the seat belt indicator wire attached. You'll want to retain this wire so you can plug it back into the car when complete. If you don't you'll have the fasten seatbelt indicator light eluminated as well as any beeping sound your vehciles makes. You may also need to remove the seat belt from the outboard side of the seat as some vehicles have the entire seat belt attached to the seat. The Planted Seat Bracket will include a seat belt tab on the outboard side as well as inboard side for vehicles that require it. Attach your seat belt and or receptacle to the universal tab(s) on the Planted Seat Bracket with a nut, bolt, washers or similar hardware (Grade 8 or better hardware is recommended). The seat belt tabs on the Planted Seat Bracket are universal so you will need to source your own hardware and in some cases may need to replace the seat belt receptacle itself due to fitment. The seat belt tab(s) can also be used to attach a harness lap belt.
- Install the assembly - Now that all of your components are attached in one assembly (or two if installing both driver and passenger seats), carefully place the assembly(s) in the vehicle. Re-connect the seat belt receptacle wire(s) under the seat(s) (if retaining the seat belt receptacle) and tighten the Planted Seat Bracket(s) to the floor of the vehicle using the factory hardware or other hardware if necessary. Sit in the seat and make sure the door still closes and the seating position is as desired.
- Reconnect Battery - Once you are happy with the final position, reconnect the battery. *Please note, if you have an airbaig sensor or weight sensor in the factory seat you will likley have warning lights eluminated unless you install an electronic resistor(s). Every vehicle is different and may require a different ohm resistor so do some research online or consult an electrician to eliminate these warning indicators.
- Take pictures and submit your installation - Now that your installation is complete take some pictures and submit your installation to us along with the picture you already took so we can post them on our website as a reference for other customers, and feel free to share them on social media as well!
- Review your products - Now that you're all done be sure to review the products on our website. Other customers use these reviews to make buying decisions and we use them to make product improvements. Just locate the item(s) on our website and click the link at the bottom of the product listing below the description, then follow the instructions to submit your review.
Side Mount Seat With Sliders
- Inspect the parts - Make sure that you have the correct items for your installation. The number one reason for fitment issues is having the wrong components.
- Disconnect the battery - You'll want to disconnect the battery for several reasons. First, you'll have the doors open for an extended period of time which can drain the battery with door open indicator lights on. Second, disconnecting the seat belt, weight & airbag sensors can cause warning lights to come on if the battery is still connected. Lastly, it's always a good idea to disconnect the battery when working on anything associated with the airbag. *Before you disconnect the battery do yourself a favor and roll down all power windows and adjust any power seats to a centered, low postision. This will make the removal much easier. If you have a power only trunk it's not a bad idea to open it in case you need access for any reason.
- Remove the factory seat(s) - Before removing the driver seat be sure to note the seating position. The steering wheel in most vehicles is off-center from the seat. This can be accentuated with an aftermarket seat which is a different size then the factory seat. Using a wrench, socket or similar tool remove the bolts that hold the factory seat(s) to the floor of the vehicle. Disconnect any wires under the seat(s). Carefully remove the seat(s) being sure to keep the factory floor bolts as you will re-use them to bolt in your Planted Seat Bracket.
- Test fit the Planted Seat Bracket - Now that you have the factory seat(s) out of the way, set your Planted Seat Bracket(s) in the vehicle and make sure you can thread in all of the floor mounting bolts (in some cases the factory floor bolts may be too long to be re-used so you may need to source some new hardware). If you have any fitment issues please double check that you have the correct seat bracket(s) for your vehicle then contact us so we can help. Please note that the seat bracket may not fit properly if the floor of the vehicle has been modified for any reason. For example, an accident repair or roll bar / roll cage installation. Assuming the bracket(s) fit properly, take a few pictures so you can submit your installation for our website, then remove the bracket(s) from the vehicle as you'll assemble the components outside of the vehicle.
- Assemble all components - Using the 4 bolts & washers from the Planted Side Mount Hardware Kit loosely attach the Planted Side Mounts to the side of the seat. The slotted end of the side mount is the front and the end with the holes is the rear because this is where the majority of your weight will be when sitting in the seat. The flange of the side mounts go toward the seat with the Planted logo facing away from the seat. Now, using 4 nuts, bolts and washers from the Planted Seat Hardware Kit loosely attach the sliders to the Planted Side Mounts. The nuts and washers go on the side mount side with the bolt head inside the sliders. Make sure the sliders are in the correct orientation. The handle should be forward and to release the sliders you'd pull up on the handle (while sitting in the seat). Now, with the seat bottom side up and the sliders in a parallel even position, set the Planted Seat Bracket bottom side up on the sliders to align one of the hole patterns on the Planted Seat Bracket with the hole pattern on the sliders (Make sure you've got the driver seat matched with the driver bracket and the passenger seat matched with the passenger bracket). Once you've found the matching pattern use the other 4 bolts, washers and nuts from the Planted Seat Hardware Kit to finger tighten the Planted Seat Bracket to the sliders. The washers and nuts go on the bottom of the Planted Seat bracket with the bolt head inside of the sliders. If there is not a hole pattern on the seat bracket that matches your sliders, you can drill holes in the Planted Seat Bracket to create your own hole pattern. Be sure to use a metal drill bit! *Once you have drilled into the Planted Seat Bracket it is not returnable or exchangeable for any reason.
- Attach your seat belt receptacle (Optional) - If you are planning to retain the use of your factory seat belt, now is the time to attach your factory seat belt receptacle to the universal seat belt tab on the Planted Seat Bracket. Older vehciles have the seat belt receptacle attached to the chassis of the car and newer vehicles have it attached to the seat itself. This step is only necessary for vehicles with the seat belt receptacle attached to the seat. Remove the seat belt receptacle from the inboard side of the factory seat with the seat belt indicator wire attached. You'll want to retain this wire so you can plug it back into the car when complete. If you don't you'll have the fasten seatbelt indicator light eluminated as well as any beeping sound your vehciles makes. You may also need to remove the seat belt from the outboard side of the seat as some vehicles have the entire seat belt attached to the seat. The Planted Seat Bracket will include a seat belt tab on the outboard side as well as inboard side for vehicles that require it. Attach your seat belt and or receptacle to the universal tab(s) on the Planted Seat Bracket with a nut, bolt, washers or similar hardware (Grade 8 or better hardware is recommended). The seat belt tabs on the Planted Seat Bracket are universal so you will need to source your own hardware and in some cases may need to replace the seat belt receptacle itself due to fitment. The seat belt tab(s) can also be used to attach a harness lap belt.
- Test fit the assembly - Now that all of your components are attached in one assembly (or two if installing both driver and passenger seats), carefully place the assembly(s) in the vehicle. Finger tighten the seat bracket(s) to the floor of the vehicle. Because in the above steps you only finger tightened the hardware, you should have some adjustment from side to side in the slots on the Planted Seat Bracket and the slots on the Planted Side Mounts. Sit in the seat and find your desired seating position. You can change the angle and height of the seat by changing the holes used on the Planted Side Mounts. Ensure that the door closes and that the sliders are parallel and slide easily. If the seat hits the door preventing it from closing, the seat may be too large for the vehicle or you may need to drill new holes in the Planted Seat Bracket to position the seat closer to the transmission tunnel, away from the door. Similarly you may find that there is very little room for the seat belt receptacle and wish to move the seat closer to the door. The Planted Seat Bracket is universal and designed to work with many different sized seats so to acheive your specific desired position may require drilling your own hole pattern into the Planted Seat Bracket. You may also find it necessary to bend the seat belt tab(s).
- Final assembly - Now that you have found your desired seating postion it's time to permanently tighten all hardware. You should attempt to get everything tight with the assembly still in the car to ensure the seating position doesn't change. You may want to enlist some help for this final step so one person can sit in the seat and hold the postion, while the other person tightens all of the hardware. If necessary, you can remove the assembly to tighten the hardware but be careful to maintain the desired seat postion. Be sure to reconnect the seat belt indicator wire if retaining the stock belt so you don't get the fasten seat belt light and beeping noise.
- Reconnect Battery - Once everything is tight and the seat is sliding smoothly, reconnect the battery. *Please note, if you have an airbaig sensor or weight sensor in the factory seat you will likley have warning lights eluminated unless you install an electronic resistor(s). Every vehicle is different and may require a different ohm resistor so do some research online or consult an electrician to eliminate these warning indicators.
- Take pictures and submit your installation - Now that your installation is complete take some pictures and submit your installation to us along with the picture you already took so we can post them on our website as a reference for other customers, and feel free to share them on social media as well!
- Review your products - Now that you're all done be sure to review the products on our website. Other customers use these reviews to make buying decisions and we use them to make product improvements. Just locate the item(s) on our website and click the link at the bottom of the product listing below the description, then follow the instructions to submit your review.
Side Mount Seat Fix Mounted Without Sliders
- Inspect the parts - Make sure that you have the correct items for your installation. The number one reason for fitment issues is having the wrong components.
- Disconnect the battery - You'll want to disconnect the battery for several reasons. First, you'll have the doors open for an extended period of time which can drain the battery with door open indicator lights on. Second, disconnecting the seat belt, weight & airbag sensors can cause warning lights to come on if the battery is still connected. Lastly, it's always a good idea to disconnect the battery when working on anything associated with the airbag. *Before you disconnect the battery do yourself a favor and roll down all power windows and adjust any power seats to a centered, low postision. This will make the removal much easier. If you have a power only trunk it's not a bad idea to open it in case you need access for any reason.
- Remove the factory seat(s) - Before removing the driver seat be sure to note the seating position. The steering wheel in most vehicles is off-center from the seat. This can be accentuated with an aftermarket seat which is a different size then the factory seat. Using a wrench, socket or similar tool remove the bolts that hold the factory seat(s) to the floor of the vehicle. Disconnect any wires under the seat(s). Carefully remove the seat(s) being sure to keep the factory floor bolts as you will re-use them to bolt in your Planted Seat Bracket.
- Test fit the Planted Seat Bracket - Now that you have the factory seat(s) out of the way, set your Planted Seat Bracket(s) in the vehicle and make sure you can thread in all of the floor mounting bolts (in some cases the factory floor bolts may be too long to be re-used so you may need to source some new hardware). If you have any fitment issues please double check that you have the correct seat bracket(s) for your vehicle then contact us so we can help. Please note that the seat bracket may not fit properly if the floor of the vehicle has been modified for any reason. For example, an accident repair or roll bar / roll cage installation. Assuming the bracket(s) fit properly, take a few pictures so you can submit your installation for our website.
- Install Planted Side Mounts onto Seat(s) - Using the 4 bolts & washers from the Planted Side Mount Hardware Kit loosely attach the Planted Side Mounts to the side of the seat(s). The slotted end of the side mount is the front and the end with the holes is the rear because this is where the majority of your weight will be when sitting in the seat. The flange of the side mounts go toward the seat with the Planted logo facing away from the seat.
- Drill your side mounts' hole pattern onto the Planted Seat Bracket - Because you are not using sliders and are instead fix mounting your seat and Planted Side Mounts to the Planted Seat Bracket you will need to drill your desired seating position's hole pattern onto the bracket. Set your seat with Planted Side Mounts attached on the Planted Seat Bracket inside the vehicle. Sit in the seat and move it around to find your desired seating position making sure the door still closes and the seat does not interfere with any other necessary functions of the vehicle. If necessary, adjust the height and angle of the seat on the side mounts by utilizing different holes on the Planted Side Mounts. Once you have found your desired seating position have a friend trace the slots or outside of the Planted Side Mounts onto the seat bracket with a pencil or similar tool. Now romove the seat and Planted Seat Bracket from the vehicle. You are almost ready to drill your holes. If your friend was able to trace the slots onto the bracket you'll drill within them. If the outline of the Planted Side Mount was traced, you'll need to now trace the slots onto the bracket which may require removing the Planted Side Mounts from the seat to gain access. Before you drill, double check the location of the holes. Once you are satisfied that you have the correct hole position, use a drill and metal drill bit to drill the hole pattern into the Planted Seat Bracket. The size of drill bit will vary depending on the hardware your're using. *Once you have drilled into the Planted Seat Bracket it is not returnable or exchangeable for any reason.
- Assemble all components - Now, using 4 nuts, bolts and washers from the Planted Seat Hardware Kit loosely attach the seat and Planted Side Mounts to the Planted Seat Bracket through the holes you drilled in the above step. The nuts and washers go on the bottom side of the Planted Seat Bracket with the bolt head on the side mount side. Make sure you've got the driver seat matched with the driver bracket and the passenger seat matched with the passenger bracket.
- Attach your seat belt receptacle (Optional) - If you are planning to retain the use of your factory seat belt, now is the time to attach your factory seat belt receptacle to the universal seat belt tab on the Planted Seat Bracket. Older vehciles have the seat belt receptacle attached to the chassis of the car and newer vehicles have it attached to the seat itself. This step is only necessary for vehicles with the seat belt receptacle attached to the seat. Remove the seat belt receptacle from the inboard side of the factory seat with the seat belt indicator wire attached. You'll want to retain this wire so you can plug it back into the car when complete. If you don't you'll have the fasten seatbelt indicator light eluminated as well as any beeping sound your vehciles makes. You may also need to remove the seat belt from the outboard side of the seat as some vehicles have the entire seat belt attached to the seat. The Planted Seat Bracket will include a seat belt tab on the outboard side as well as inboard side for vehicles that require it. Attach your seat belt and or receptacle to the universal tab(s) on the Planted Seat Bracket with a nut, bolt, washers or similar hardware (Grade 8 or better hardware is recommended). The seat belt tabs on the Planted Seat Bracket are universal so you will need to source your own hardware and in some cases may need to replace the seat belt receptacle itself due to fitment. The seat belt tab(s) can also be used to attach a harness lap belt.
- Install the assembly(s) - Now that all of your components are attached in one assembly (or two if installing both driver and passenger seats), carefully place the assembly(s) in the vehicle. Re-connect the seat belt receptacle wire(s) under the seat(s) (if retaining the seat belt receptacle) and tighten the Planted Seat Bracket(s) to the floor of the vehicle using the factory hardware or other hardware if necessary. Sit in the seat and make sure the door still closes and the seating position is as desired. Make any necessary adjustments and then tighten all hardware.
- Reconnect Battery - Once you are happy with the final position, reconnect the battery. *Please note, if you have an airbaig sensor or weight sensor in the factory seat you will likely have warning lights eluminated unless you install an electronic resistor(s). Every vehicle is different and may require a different ohm resistor so do some research online or consult an electrician to eliminate these warning indicators.
- Take pictures and submit your installation - Now that your installation is complete take some pictures and submit your installation to us along with the picture you already took so we can post them on our website as a reference for other customers, and feel free to share them on social media as well!
- Review your products - Now that you're all done be sure to review the products on our website. Other customers use these reviews to make buying decisions and we use them to make product improvements. Just locate the item(s) on our website and click the link at the bottom of the product listing below the description, then follow the instructions to submit your review.
Side Mount Seat With Sliders Onto 240SX Or 300ZX Low Style Seat Brackets
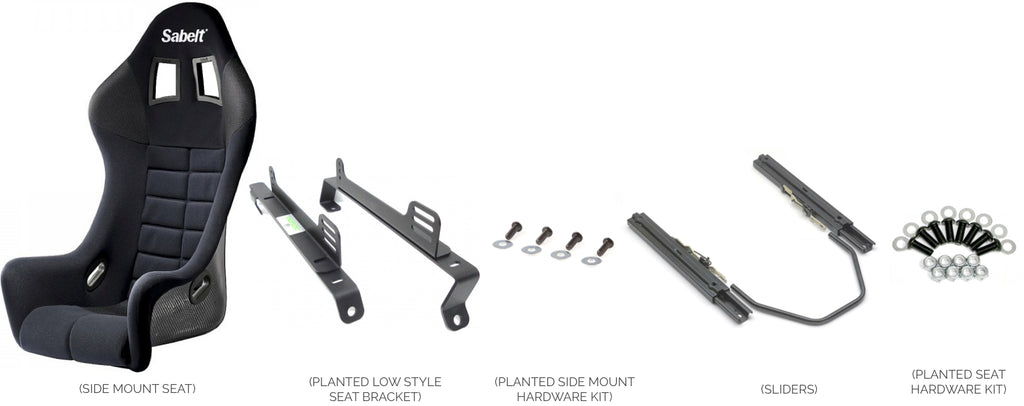
*Disclaimer: We recommend not using sliders with LOW style mounts. LOW style mounts are designed to position the seat as low as possible. Adding sliders will raise the seat 1 inch, requires modification to the slider handle, and there may be clearance issues preventing the sliders from functioning properly.
- Inspect the parts - Make sure that you have the correct items for your installation. The number one reason for fitment issues is having the wrong components.
- Disconnect the battery - You'll want to disconnect the battery for several reasons. First, you'll have the doors open for an extended period of time which can drain the battery with door open indicator lights on. Second, disconnecting the seat belt, weight & airbag sensors can cause warning lights to come on if the battery is still connected. Lastly, it's always a good idea to disconnect the battery when working on anything associated with the airbag. *Before you disconnect the battery do yourself a favor and roll down all power windows and adjust any power seats to a centered, low postision. This will make the removal much easier. If you have a power only trunk it's not a bad idea to open it in case you need access for any reason.
- Remove the factory seat(s) - Before removing the driver seat be sure to note the seating position. The steering wheel in most vehicles is off-center from the seat. This can be accentuated with an aftermarket seat which is a different size then the factory seat. Using a wrench, socket or similar tool remove the bolts that hold the factory seat(s) to the floor of the vehicle. Disconnect any wires under the seat(s). Carefully remove the seat(s) being sure to keep the factory floor bolts as you will re-use them to bolt in your Planted Seat Bracket.
- Test fit the Planted Low Style Seat Brackets - Now that you have the factory seat(s) out of the way, set your left and right Planted Low Style Seat Bracket(s) in the vehicle (without the side mounts). It should be fairly straight forward as to which parts go where but if not contact us so we can help. Make sure you can thread in all of the floor mounting bolts (in some cases the factory floor bolts may be too long to be re-used so you may need to source some new hardware). If you have any fitment issues please double check that you have the correct seat bracket(s) for your vehicle then contact us so we can help. Please note that the seat bracket may not fit properly if the floor of the vehicle has been modified for any reason. For example, an accident repair or roll bar / roll cage installation. Assuming the bracket(s) fit properly, take a few pictures so you can submit your installation for our website. Leave the left and right brackets in the car for now.
- Assemble components - Using the 4 bolts & washers from the Planted Side Mount Hardware Kit loosely attach the Planted Side Mounts to the side of the seat. The slotted end of the side mount is the front and the end with the holes is the rear because this is where the majority of your weight will be when sitting in the seat. The flange of each side mount faces away from the seat with the Planted logo facing away from the seat as well. Now, using 4 nuts, bolts and washers from the Planted Seat Hardware Kit loosely attach the sliders to the Planted Side Mounts. (Because in this setup the sliders are most likely wider then they are designed to be you will most likley either need to cut or bend the slider handle to fit this wider configuration). The nuts and washers go on the side mount side with the bolt head inside the sliders. Make sure the sliders are in the correct orientation. The handle should be forward and to release the sliders you'd pull up on the handle (while sitting in the seat). If you had to cut the handle you will need ot pull up on each side of the handle to release the sliders. *Note: sliders that rely on compression to hold the handle in place will not work with this setup due to the wider then normal slider position. Now, with the sliders in a parallel even position, set the seat assembly in the vehicle so the seat slides between the left and right seat brackets and the sliders sit on them. Make sure you've got the driver seat matched with the driver bracket and the passenger seat matched with the passenger bracket. Align the slider hole pattern with the hole pattern in the left and right seat brackets and use the remaining 4 nuts bolts and washers from the Planted Seat Hardware Kit to finger tighten the sliders to the left and right seat brackets. The washers and nuts go on the bottom of the Planted Seat bracket with the bolt head inside of the sliders. If there is not a hole pattern on the seat bracket that matches your sliders, you can drill holes in the Planted Seat Brackets to create your own hole pattern. Be sure to use a metal drill bit! *Once you have drilled into the Planted Seat Bracket it is not returnable or exchangeable for any reason.
- Attach your seat belt receptacle (Optional) - If you are planning to retain the use of your factory seat belt, now is the time to attach your factory seat belt receptacle (only if it orignally was attached to the seat so is no longer in the vehicle). Because the Planted Low Style Seat Brackets do not include provisions for mounting a seat belt receptacle, you'll want to drill a hole in or near the transmission tunnel and use a Planted Reinforcement Plate and bolt to attach the receptacle. Be sure to put it in a location that is functional when the seat is in your driving position. You may need ot remove the seat assembly to gain access to drill the hole.
- Final assembly - Because in the above steps you only finger tightened the hardware, you should have some adjustment from side to side in the slots on the Planted Seat Brackets and the slots on the Planted Side Mounts. Sit in the seat and find your desired seating position. You can change the angle and height of the seat by changing the holes used on the Planted Side Mounts. Ensure that the door closes and that the sliders are parallel and slide easily. If the seat hits the door preventing it from closing, the seat may be too large for the vehicle or may need some modification to fit. Once you have found your desired seating postion it's time to permanently tighten all hardware. You should attempt to get everything tight with the assembly still in the car to ensure the seating position doesn't change. You may want to enlist some help for this final step so one person can sit in the seat and hold the postion, while the other person tightens all of the hardware. If necessary, you can remove the assembly to tighten the hardware but be careful to maintain the desired seat postion. Be sure to reconnect the seat belt indicator wire if retaining the stock belt so you don't get the fasten seat belt light and beeping noise.
- Reconnect Battery - Once everything is tight and the seat is sliding smoothly, reconnect the battery. *Please note, if you have an airbaig sensor or weight sensor in the factory seat you will likley have warning lights eluminated unless you install an electronic resistor(s). Every vehicle is different and may require a different ohm resistor so do some research online or consult an electrician to eliminate these warning indicators.
- Take pictures and submit your installation - Now that your installation is complete take some pictures and submit your installation to us along with the picture you already took so we can post them on our website as a reference for other customers, and feel free to share them on social media as well!
- Review your products - Now that you're all done be sure to review the products on our website. Other customers use these reviews to make buying decisions and we use them to make product improvements. Just locate the item(s) on our website and click the link at the bottom of the product listing below the description, then follow the instructions to submit your review.
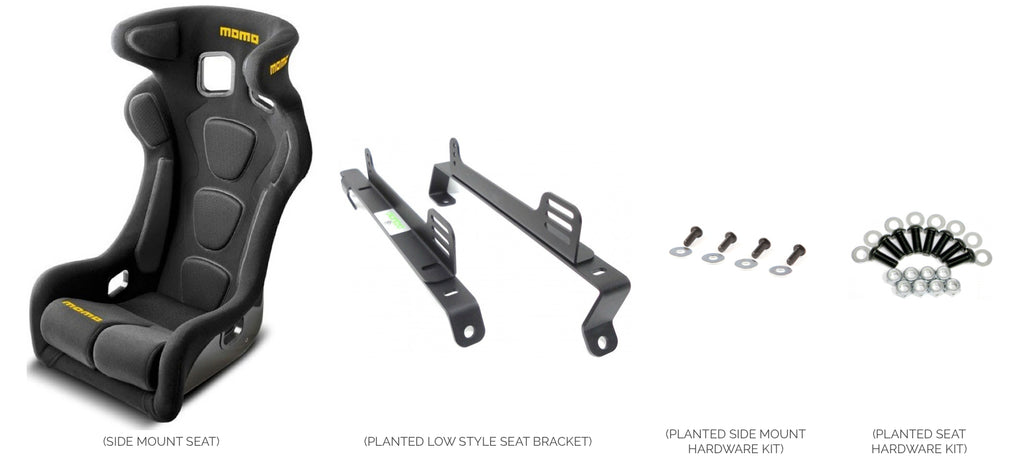
Side Mount Seat Fix Mounted Without Sliders Onto 240SX Or 300ZX Low Style Seat Brackets
- Inspect the parts - Make sure that you have the correct items for your installation. The number one reason for fitment issues is having the wrong components.
- Disconnect the battery - You'll want to disconnect the battery for several reasons. First, you'll have the doors open for an extended period of time which can drain the battery with door open indicator lights on. Second, disconnecting the seat belt, weight & airbag sensors can cause warning lights to come on if the battery is still connected. Lastly, it's always a good idea to disconnect the battery when working on anything associated with the airbag. *Before you disconnect the battery do yourself a favor and roll down all power windows and adjust any power seats to a centered, low postision. This will make the removal much easier. If you have a power only trunk it's not a bad idea to open it in case you need access for any reason.
- Remove the factory seat(s) - Before removing the driver seat be sure to note the seating position. The steering wheel in most vehicles is off-center from the seat. This can be accentuated with an aftermarket seat which is a different size then the factory seat. Using a wrench, socket or similar tool remove the bolts that hold the factory seat(s) to the floor of the vehicle. Disconnect any wires under the seat(s). Carefully remove the seat(s) being sure to keep the factory floor bolts as you will re-use them to bolt in your Planted Seat Bracket.
- Test fit the Planted Low Style Seat Brackets - Now that you have the factory seat(s) out of the way, set your left and right Planted Low Style Seat Bracket(s) in the vehicle (without the side mounts). It should be fairly straight forward as to which parts go where but if not contact us so we can help. Make sure you can thread in all of the floor mounting bolts (in some cases the factory floor bolts may be too long to be re-used so you may need to source some new hardware). If you have any fitment issues please double check that you have the correct seat bracket(s) for your vehicle then contact us so we can help. Please note that the seat bracket may not fit properly if the floor of the vehicle has been modified for any reason. For example, an accident repair or roll bar / roll cage installation. Assuming the bracket(s) fit properly, take a few pictures so you can submit your installation for our website. Leave the left and right brackets in the car for now.
- Assemble components - Using the 4 bolts & washers from the Planted Side Mount Hardware Kit loosely attach the Planted Side Mounts to the side of the seat. The slotted end of the side mount is the front and the end with the holes is the rear because this is where the majority of your weight will be when sitting in the seat. The flange of each side mount faces away from the seat with the Planted logo facing away from the seat as well. Now, set the seat and side mount assembly in the vehicle so the seat slides between the left and right seat brackets and the side mounts sit on them. Make sure you've got the driver seat matched with the driver bracket and the passenger seat matched with the passenger bracket.
- Drill your side mounts' hole pattern onto the Planted Seat Brackets - Because you are not using sliders and are instead fix mounting your seat and Planted Side Mounts to the Planted Seat Brackets you will need to drill your desired seating position's hole pattern onto the brackets. Sit in the seat and move it around to find your desired seating position making sure the door closes and the seat does not interfere with any other necessary functions of the vehicle. If the seat hits the door preventing it from closing, the seat may be too large for the vehicle or may need some modification to fit. If necessary, adjust the height and angle of the seat on the side mounts by utilizing different holes on the Planted Side Mounts. Once you have found your desired seating position have a friend trace the slots of the Planted Side Mounts onto the seat bracket with a pencil or similar tool. Now romove the seat, side mounts and Planted Seat Brackets from the vehicle. You are almost ready to drill your holes. Before you drill, double check the location of the holes. Once you are satisfied that you have the correct hole position, use a drill and metal drill bit to drill the hole pattern into the left and right Planted Seat Brackets. The size of drill bit will vary depending on the hardware your're using. *Once you have drilled into the Planted Seat Bracket it is not returnable or exchangeable for any reason.
- Attach your seat belt receptacle (Optional) - If you are planning to retain the use of your factory seat belt, now is the time to attach your factory seat belt receptacle (only if it orignally was attached to the seat so is no longer in the vehicle). Because the Planted Low Style Seat Brackets do not include provisions for mounting a seat belt receptacle, you'll want to drill a hole in or near the transmission tunnel and use a Planted Reinforcement Plate and bolt to attach the receptacle. Be sure to put it in a location that is functional when the seat is in your driving position. You may need ot remove the seat assembly to gain access to drill the hole.
- Final assembly - Now, resintall the left and right seat brackets in the vehicle and set the seat with side mounts onto the left and right brackets as you had done previously. Align the hole pattern on the side mounts with the hole pattern you drilled into the left and right seat brackets. Using 4 nuts, 4 bolts and 8 washers from the Planted Seat Hardware Kit, attach and finger tighten the side mounts to the left and right seat brackets. Put the nuts and washers under the seat brackets with the bolt head and washers on the side mounts. Sit in the seat and find your desired seating position again (You'll have some side to side adjustment on the slots of the side mounts). Ensure that the door still closes. Once you have found your desired seating postion it's time to permanently tighten all hardware. You should attempt to get everything tight with the assembly still in the car to ensure the seating position doesn't change. You may want to enlist some help for this final step so one person can sit in the seat and hold the postion, while the other person tightens all of the hardware. If necessary, you can remove the assembly to tighten the hardware but be careful to maintain the desired seat postion. Be sure to reconnect the seat belt indicator wire if retaining the stock belt so you don't get the fasten seat belt light and beeping noise.
- Reconnect Battery - Once everything is tight reconnect the battery. *Please note, if you have an airbaig sensor or weight sensor in the factory seat you will likley have warning lights eluminated unless you install an electronic resistor(s). Every vehicle is different and may require a different ohm resistor so do some research online or consult an electrician to eliminate these warning indicators.
- Take pictures and submit your installation - Now that your installation is complete take some pictures and submit your installation to us along with the picture you already took so we can post them on our website as a reference for other customers, and feel free to share them on social media as well!
- Review your products - Now that you're all done be sure to review the products on our website. Other customers use these reviews to make buying decisions and we use them to make product improvements. Just locate the item(s) on our website and click the link at the bottom of the product listing below the description, then follow the instructions to submit your review.